
I have been quite on the blog front for a while as when we got home from summer holiday in early August we had lots of water in the 2nd floor bathroom floor which had run down a crack in the floor into the living room underneath. So I have spent almost every free hour after that figuring out where the water was coming from by removing walls. And finding a lot of rot in the construction where the water came in. And the water damage in the living room also kicked off a total renovation of the living room. As the insurance does not cover everything we will need to do some stuff our self.
But today i found some time to write this blog post for you, and it’s about Upgrading your S2D cluster to 2019 🙂
In the next month or so Windows Server 2019 will be released to the public. Next week at Ignite the date will most likely be announced. And you me and every S2D administrator will want to look into how we can upgrade our cluster from Windows Server 2016 to 2019 to get all the new features that will be available in 2019. In this post I will explain the upgrade steps needed to do a Rolling Cluster Upgrade from 2016 to 2019.
Rolling Cluster Upgrade
When it comes to doing a Cluster Upgrade with S2D there is quite a few things to think about. In a Hyper-V Cluster with a shared storage like a SAN you can take out the amount of nodes you have resiliency for to do the upgrade. If you have enough space in a 16 node cluster to take out 8 at once you can do so.
However since S2D uses local attached disks, means that when you evict the node from the cluster you also removes the storage, and the storage get degraded. Meaning you should only do 1 and 1 node at the time to be sure you have enough storage resiliency to keep your virtual disks up working. When removing a node your virtual disk’s will go in to Degraded, Incomplete state just like when you boot a node.

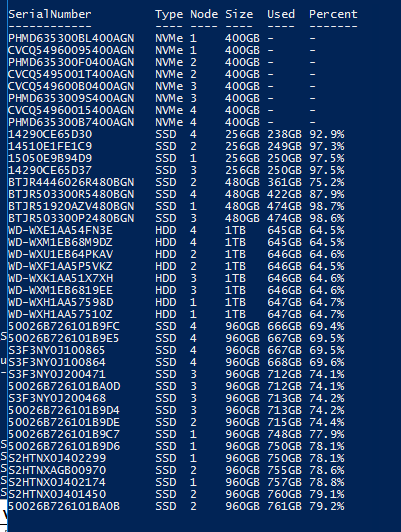
Prior to evicting a node from the cluster make sure all Virtual Disks are healthy and that data is balanced out across your nodes even. You can run the show-prettypool.ps1 script to see if your disks are balanced out correctly. Make sure they are as even as possible. If they are not run Optimize-Storagepool – FriendlyName S2D
Then check again if it’s as close as possible. It should look something like this.
Removing the first Node from the Cluster
#First run  the Show-Prettypool.ps1 script, you can download it here. https://blogs.technet.microsoft.com/filecab/2016/11/21/deep-dive-pool-in-spaces-direct/
Show-Prettypool.ps1
#If not balanced run
Optimize-Storagepool - FriendlyName S2D*
#Then run show-prettypool.ps1 again
Show-Prettypool.ps1
#Make sure all Storage Jobs are done
Get-StorageJob
#Make sure all VirtualDisks are healthy
Get-VirtualDisk
#Now it's time to suspend the clusternode and drain it
Suspend-ClusterNode -Name "Node1" -Drain
Get-ClusterNode
#Once the node is paused Let's evict the cluster node If you are not reusing the node use the -CleanupDisks trigger as well.
Remove-ClusterNode -Name "Node1" -Confirm
Now that the node is removed from the cluster redeploy the node with the new Windows Server 2019 image and apply all settings on the node. Make sure to update drivers with latest versions for 2019. 2016 drivers will work for 2019 but I do recommend if your HW vendor is a good WSSD certified vendor they will have drivers ready for 2019 when 2019 is released.
I use VMM to deploy Windows Server to my physical hosts with Bare Metal Deployment, post coming soon about how to do this. So update the deployment vhdx file with 2019, update the drivers beeing used for the deployment and redeploy the host.
Very important do not touch the Storage Disks as these will be added back into to the pool. If you did run the -CleanupDisks with removing the node, you will need to make sure the disks are cleaned before adding the server back into the cluster. This can be done with the Clear-SdsConfig.ps1 script.
Adding the Node back into the Cluster
Once the node is redeployed with 2019 and is fully compliant we need to add the Node back into the cluster.
#First run the Test-Cluster command with alle the nodes

$ClusterNodes = "Node1", "Node2", "Node3", "Node4"

$ClusterName = Cluster1

Test-Cluster –Node $ClusterNodes –Include “Storage Spaces Direct”,Inventory,Network,”System Configuration”

#Go through the Test-Cluster log

Invoke-Item "\\$($ClusterNodes[0])\c$\Windows\cluster\Reports"

#If the Test-Cluster is ok add the cluster node, if not fix what is wrong on the redeployed node.

Add-ClusterNode -Cluster $ClusterName -Name Node1

#Once the node is in check storage jobs as a sync will initiate

Get-StorageJob

#Check virtualdisks they should be inservice now

Get-VirtualDisk

#Once all repairs are done check balance of data

Show-Prettypool.ps1

#If uneven run Optimize-StoragePool again

Optimize-Storagepool - FriendlyName S2D*
Continue on the next Node’s
Before next node can be done make sure all Storage Jobs are done and all VirtualDisks are healthy. Make also sure that the storage is evenly placed on all capacity drives. Once ready redo the above steps to each node in order.
Once all servers in the cluster is upgraded to latest version you need to upgrade the cluster function level and the virtual machine version. The virtual machines need to be offline for the version to be updated. So you will need to plan downtime for your vm’s.
Conclusion
Doing a Cluster Rolling Upgrade involves quite a few steps, det redeployment after a node is taken out of the cluster is pretty fast if you use Bare Metal Deployment and use scripts to add all features and PowerShell commands to the server. Anything from 30-60 minutes or so. What will take time and which is the important thing is the Storage sync and rebalance of data on capacity drives.
Also removing a node without having the capacity storage balanced out might cause VirtualDisks to go into a detached state.